
Most gutters fall within these profiles show below. If you have a box gutter or any other shape please call us.
Installation instruction/guidance for installing GuttaFilta™ into your gutters.
Note – we recommend wearing protective gloves for increased safety while installing GuttaFilta™.
Step 1
Walk the entire area where you will be working to install GuttaFilta™ and establish if there are any exposed power lines within reach or nearby.
If there are please contact your electricity provider or Energex to discuss the precautions you need to take. If in doubt seek advice.
Step 2
The gutters and down pipes must be cleaned of all leaves, dirt, debris etc. Pay particular attention to corners and elbows. We recommend that all gutters are thoroughly cleaned. Professional cleaning, whilst dearer than doing it
yourself, provides the best preparation for the best results of GuttaFilta™. For any warranty claims evidence of an adequate cleaning process is mandatory and, if unable to be evidenced, will void your warranty. GuttaFilta™ cannot
protect your gutters and down pipes from material left in them.
Step 3
Check to ensure that the GuttaFilta™ you have purchased is the correct size for your gutter. We recommend trialling one length in an easy access area to confirm the size you have selected is correct.
Step 4
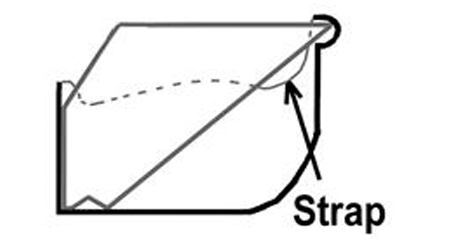
Inserting the GuttaFilta™ into your gutter. There are two ways gutters can be attached to the fascia of houses. They can be fitted either with EXTERNAL gutter clips or brackets or with INTERNAL gutter clips or brackets. With the
external brackets they will run under your gutter and with internal brackets they will be evident on the inside of your gutter.
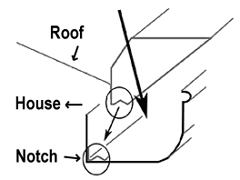
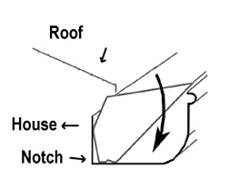
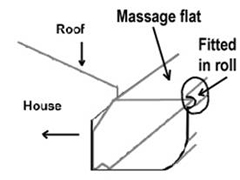
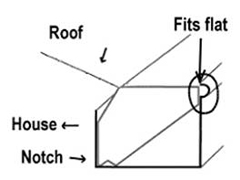
Note - if the product you have chosen has a square edge i.e. GF011 the outer edge of the GuttaFilta™ fits flat against the outer edge of the gutter (refer figure d).
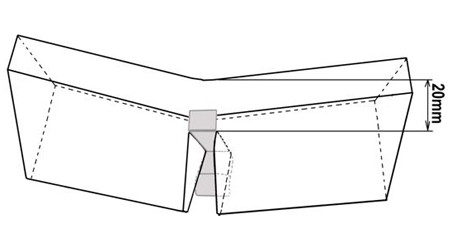
For installing GuttaFilta™ in gutters with INTERNAL brackets……….the process is identical to that of gutters with external brackets EXCEPT you will need to fit the GuttaFilta™ OVER the brackets in your gutter (NOTE - do NOT fit the GuttaFilta™ UNDER the brackets). For the best results we recommend that a slice be put into the GuttaFilta™ section from the BOTTOM up to within 20 mm of the top (but NOT all the way through) to allow the GuttaFilta™ to wrap/fit snugly over the bracket. Refer "figure "e".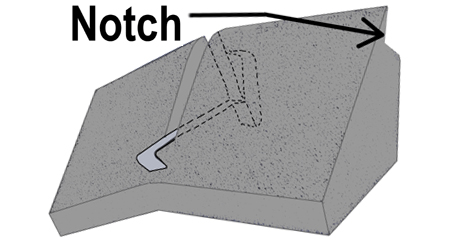
Hint - lay the GuttaFilta™ section on the roof and mark where each of the brackets will be positioned under the GuttaFilta™ when fitted and, using a sharp edge (such as a knife), put all the necessary slices in the GuttaFilta™. Then roll
the GuttaFilta™ into the gutter and fit as described above in EXTERNAL brackets advice. Note - the edge with the "notch" or "v" is the bottom and this is the edge you will need to slice through and keep slicing until within 20mm of the top (opposite side).
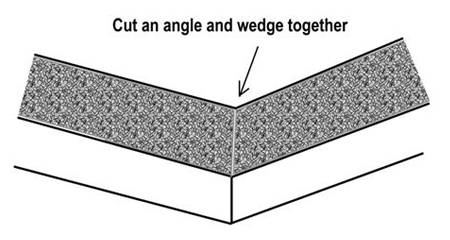
For CORNERS and ELBOWS………..with either INTERNAL or EXTERNAL bracketed gutters the process is as described above however you will need to also cut the foam at an angle to go around the corner. We recommend that you cut the GuttaFilta™ section LONGER than
is required. The reason for this is that, because it is a flexible product, it will squash into itself when you butt the two corner cuts together. It is better for the GuttaFilta™ to be pushed together tightly than being a little short and leaving a gap.
Note
GuttaFilta is at its most efficient when wet. To explain - if you were to hose your roof and let the water flow onto the guttafilta when it was dry the first wash of water MAY "skate" across the top of the filta and overflow. This will only happen
until the filter becomes wet (unless there are other factors - refer website). HOWEVER if you were to hose the guttafilta FIRST then hose the roof the first wash of water will flow easily through the filta with no overflow (again unless there are
other factors - again refer website).
Generally though the rain will fall on the guttafilta at the same as the roof and, therefore, the guttafilta will be wet when the first flows start running off the roof into it.
Please be aware that the first wash of water MAY skate and overflow - it does not mean your guttafilta is flawed, failing or installed incorrectly. Maintenance
Regular maintenance may be important for the efficiency of GuttaFilta™ and GuttaFilta™ Valley and may greatly reduce the need for messy gutter cleaning. Leaves will gather on top of the GuttaFilta™ and GuttaFilta™ Valley and these should be removed
periodically for GuttaFilta™ and GuttaFilta™ Valley to work at maximum efficiency. We recommend, on a regular basis, you remove the GuttaFilta™ and GuttaFilta™ Valley and shake out all the gathered debris. Blow leaves off GuttaFilta™ as needed and more
regular if in a high leaf fall area. GuttaFilta™ and GuttaFilta™ Valley will dry quickly in full sunlight. In areas where GuttaFilta™ and GuttaFilta™ Valley does not get sustained sunlight we recommend shaking the excess water from the filter to speed
up the drying process.
Installation instruction/guidance for installing GuttaFilta™ VALLEY.
Note – we recommend wearing protective gloves for increased safety while installing GuttaFilta™.
Step 1
Walk the entire area where you will be working to install GuttaFilta™ Valley and establish if there are any exposed power lines within reach or nearby. If there are please contact your electricity provider or Energex to discuss the precautions
you need to take.
If in doubt seek advice.
Step 2
Your valleys must be cleaned of all leaves, dirt, debris etc. We recommend that all valleys are thoroughly cleaned. Professional cleaning, whilst dearer than doing it yourself, provides the best preparation for the best results of GuttaFilta™ Valley.
For any warranty claims evidence of this cleaning process is mandatory and, if unable to be evidenced, will void your warranty. GuttaFilta™ Valley cannot protect your gutters and down pipes from material left in them.
Step 3
Check to ensure that the GuttaFilta™ Valley you have purchased is the correct size for your valleys. Some houses may have a few different size valleys on the one roof. We recommend trialling one length in an easy access area to confirm the
size you have selected is correct.
Step 4
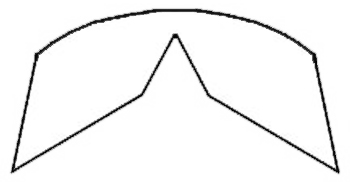
Installing your GuttaFilta™ Valley - firstly refer to figure "i". You will see the design/shape of the GuttaFilta™ Valley drawn.
Refer figure "K" - this diagram demonstrates the shape of GuttaFilta™ Valley once it has been folded INSIDE OUT.
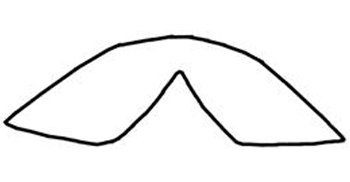
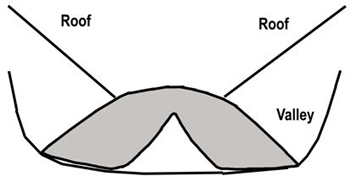
This is the correct shape for installing your GuttaFilta™ Valley. i.e. fold it inside out and insert the left and right edges under the roof overhang on each side of your roof valley section. By doing this, because the foam will "fight"
to return to its original shape, it will be held under each side of the roof overhang in your valley by the pressure. Refer figure "k".
The GuttaFilta™ Valley foam must run the entire length of the valley and butt into the GuttaFilta™ in your gutters. Trim with a sharp edge as required. NOTE…… IF there is NO roof over hang on your valleys, OR the GuttaFilta™ Valley product
you have purchased isn't fitting snugly, you will need to contact your GuttaFilta distributor or the Manufacturer to discuss the correct shape for your valleys.
Maintenance
Regular maintenance is important for the wear of GuttaFilta™ and GuttaFilta™ Valley and may greatly reduce the need for messy gutter cleaning. Leaves will gather on top of the GuttaFilta™ and GuttaFilta™ Valley and these will need to be
removed periodically for GuttaFilta™ and GuttaFilta™ Valley to work at maximum efficiency. We recommend, on a regular basis, you remove the GuttaFilta™ and GuttaFilta™ Valley and shake out all the gathered debris. Blow leaves off Guttafilta™
as needed and more regular if in a high leaf fall area. GuttaFilta™ and GuttaFilta™ Valley will dry quickly in full sunlight. In areas where GuttaFilta™ and GuttaFilta™ Valley does not get sustained sunlight we recommend shaking the excess
water from the filter to speed up the drying process. Please note: GuttaFilta™ and GuttaFilta™ Valley is fire retardant as in that it is self-extinguishing. In designated fire prone areas, GuttaFilta™ and GuttaFilta™ Valley may not be
appropriate to use as it may not pass the fire rating required. We accept no responsibility for GuttaFilta™ and GuttaFilta™ Valley being used where it does not conform to the Law or Standards. Please check the required standard
with your relevant local authority prior to purchase or installation.